
The back lever looks like a party trick, but it’s really a clean test of shoulder control, core tension, and patience. The good news is that it’s usually more attainable than skills like the front lever or planche, as long as you respect your elbows and build the position step by step. In this guide, I’ll show you the prerequisites that matter, the form cues that make the lever feel lighter, a progression path that actually works, and simple ways to program your sessions. If you want a back lever that feels solid, not sketchy, you’re in the right place.
What the back lever is and why it’s worth training
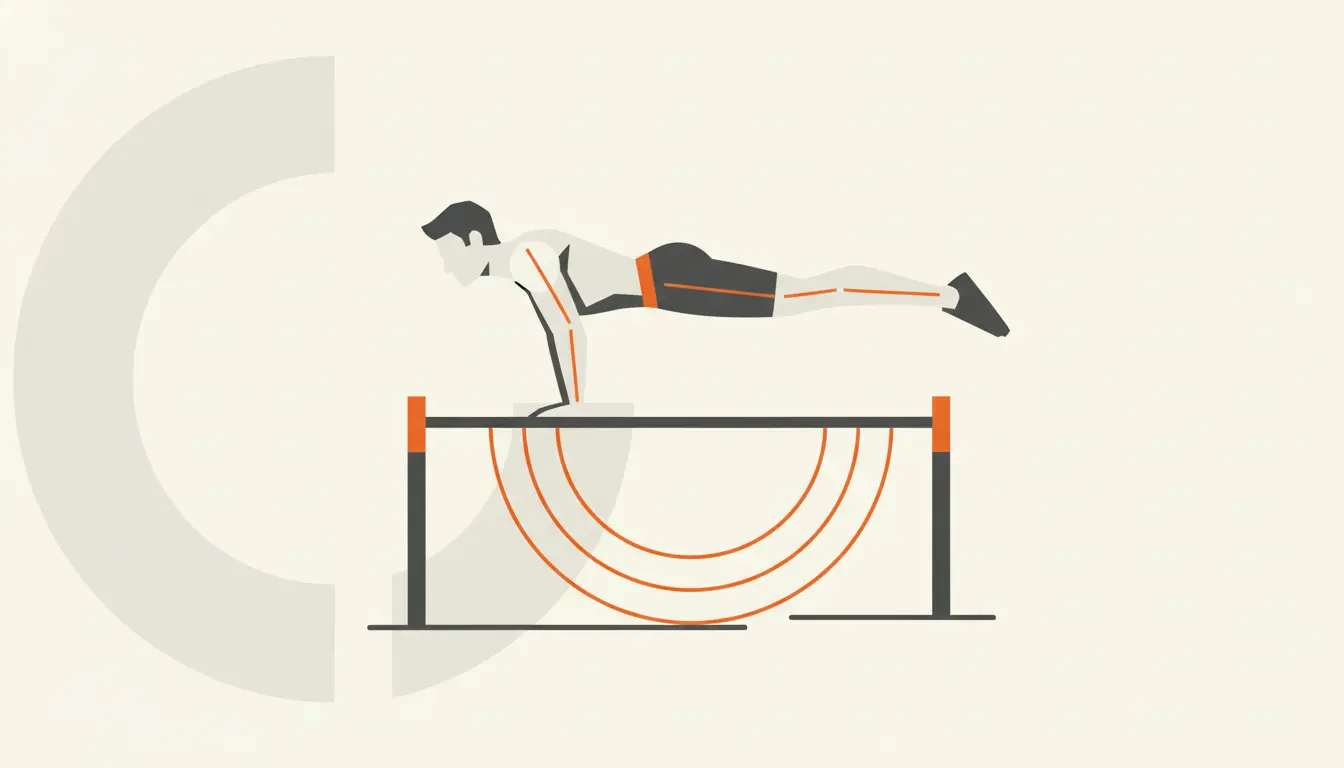
What you’re aiming for
A back lever is a static hold where your body is parallel to the floor while you hang from a bar or rings. Your arms are straight, your hips are open, and you try to create a clean line from shoulders to toes. Most people learn it with a pronated grip first because it’s friendlier on the elbows and biceps.
I like the back lever as a first “real” skill because it forces you to learn scapular control and full body tension without needing extreme pulling power. But it still demands respect: the shoulder is in extension, and if you rush, your elbows will let you know.
Benefits you’ll actually notice
If you train it consistently, the back lever tends to improve:
- Shoulder stability in extended positions
- Core and glute tension for cleaner body lines
- Awareness of scapula positioning (protraction and depression)
- Carryover to levers, swings, and general ring strength
Prerequisites: the minimum I want you to have first
Non negotiable: German hang comfort
If you only take one thing from this article, let it be this: get comfortable in a German hang before you chase a full back lever. It’s the simplest way to expose your shoulders and elbows to the exact “opened” position you’ll load in the lever.
A practical benchmark is 3 sets of 15 seconds in German hang with calm breathing and no sharp elbow sensations. Mild stretching discomfort in the shoulders can be normal. Elbow pain is not.
If you need a step by step approach, use this guide: https://calisthenics-equipment.com/how-to-train-skin-the-cat/.
Strength basics that make everything smoother
You don’t need to be a monster at pulling, but you do need a base. As a rule of thumb, you should be able to do controlled pull ups and rows without grinding. If your pull ups are still a struggle, your back lever training will feel like you’re fighting your own foundation.
- Pull ups: around 8 to 10 clean reps
- Rows: solid bodyweight rows with good control
- Core: hollow body hold and some kind of anti extension strength
- Mobility: shoulders comfortable with extension drills
For pull up form, this is a useful refresher: https://calisthenics-equipment.com/how-to-do-a-pull-up-with-perfect-form/.
Quick reality check for elbow readiness
Your elbows take a real load in the back lever, especially if you try supinated too early or you “fall” into the bottom position. If you feel sharp pain, stop the lever work and go back to German hang conditioning and easier progressions. Being stubborn here is how people lose months.
Warm up: keep it short, but don’t skip it
A warm up that matches the skill
The back lever doesn’t need a 30 minute ritual, but it does need a warm up that prepares shoulder extension, scapular control, and elbow tolerance. I usually do 8 to 12 minutes total before lever work.
General heat: light cardio or easy hangs for 2 to 3 minutes
Scapula prep: scapula pull ups and scapula push ups for control
Shoulder extension prep: gentle German hang pulses or holds
Specific sets: 2 to 3 easy sets of your current back lever progression
If you want a full template, this page is practical and not overcomplicated: https://calisthenics-equipment.com/how-to-warm-up-for-calisthenics-training/.
Back lever technique: the cues that make it feel lighter
Grip choice: start pronated and earn the rest
Train your first back lever with a pronated grip (palms away). It’s the most joint friendly option for most people. A supinated back lever can be a cool long term goal, but I consider it an “advanced variation” because it tends to load the biceps and elbows more aggressively.
Grip width matters too. A slightly narrower grip often makes the lever feel easier because it lets you create more whole body tension and keeps you from opening into a sloppy position. As you get stronger, you can widen gradually.
Shoulders: protract and depress, don’t hang passively
The back lever punishes passive shoulders. I want you to actively push the bar or rings “away” and keep the shoulder blades protracted and depressed. In simple terms, think shoulders forward and down.
If you retract hard, many people start to arch and sag. Your lever might look like it’s there, but it’s usually your lower back compensating while your shoulders take a beating.
Spine and core: hollow with a slightly rounded upper back
A cue that helps many athletes is a small amount of upper back flexion, like a subtle “hunch” through the thoracic spine. Not a folded body, just enough to shorten the lever and keep tension where you need it. Combine that with a hollow body feel: ribs down, glutes tight, legs squeezed together.
When the core is on, the position becomes predictable. When it’s off, the lever turns into a fight between your shoulders and gravity.
Entry and exit: controlled, not dramatic
Start from a hang, go through a skin the cat or from an inverted hang, and lower into your progression under control. To exit, either tuck back through skin the cat or break at the hips and step down safely. I’d rather see a clean exit than a shaky “save” that irritates elbows.
Progressions: the step by step path to a full back lever
How to choose the right progression
Your best progression is the one you can hold with good form and calm breathing. A common mistake is picking a level you can “touch” for 2 seconds with ugly shoulders and calling it training. That’s just testing.
Use one of these targets before you move on:
- Static: accumulate 30 seconds total across sets in that progression
- Quality sets: 3 sets of 10 seconds with consistent form
- Dynamic: 8 to 10 controlled reps into and out of the position
Core progressions (most people start here)
Tuck back lever: knees tight to chest, don’t let the hips open early
Advanced tuck: knees still tucked, but hips more open
One leg or stag: one leg straight, one leg tucked, keep the tucked knee close
Half lay: both legs more extended, but not fully
Straddle back lever: legs wide to shorten the lever, only if you can avoid piking
Full back lever: legs together, straight line, no sagging
Personal take: straddle is not automatically easier. If you tend to pike at the hips, a one leg variation may build cleaner habits and get you to full faster.
The vertical back lever method (my favorite for clean technique)
This method is simple and surprisingly effective. You hold your progression in a more vertical angle first, then over sessions you lower closer to parallel. It teaches control and reduces the “panic” people feel at horizontal.
Pick a progression you can hold vertically for 10 to 20 seconds
Lower to a slightly more horizontal angle and hold 3 to 5 seconds
Repeat for several sets, gradually lowering over weeks
Training methods: holds, negatives, and dynamics
Method 1: static holds (simple and measurable)
Static holds build the exact endurance you need. Keep the sets crisp and stop before form collapses. When your shoulders lose position, your joints take the load you wanted your muscles to take.
- 3 to 5 sets of 6 to 12 seconds
- Rest 60 to 120 seconds
- Stop each set with 1 to 2 seconds “in reserve”
Method 2: negatives from inverted hang (strength with control)
Negatives are great if you’re strong but struggle to hold. Lower slowly for 3 to 6 seconds into your progression, pause briefly, then come out safely. The key is to lower with the same shoulder position you want in the final hold.
Method 3: dynamic reps (if you prefer reps over timers)
Some athletes stay more consistent when they can count reps. Dynamic entries and exits also teach you to own the transition, which is where many elbows get angry.
- 3 to 4 sets of 3 to 6 controlled reps
- Pause 1 second in the best position you can manage
- Keep the tempo smooth, no dropping
Programming: how to fit back lever work into your week
A simple weekly setup
If your main goal is the back lever, I like a structure of two focused sessions plus one light technique day. That’s enough frequency to improve without beating up your elbows.
Day A (strength): static holds or negatives, plus prerequisites
Day B (strength): vertical method and dynamic reps, plus core
Day C (technique): very easy progression, short holds, perfect form
Example session (intermediate, one leg back lever)
Warm up and German hang prep
Vertical one leg lowers: 4 sets of 1 rep with a 3 to 5 second pause near parallel
One leg static holds: 4 sets of 8 to 10 seconds
Rows or pull ups: 3 sets, smooth reps, no grinding
Reverse body line core work: 3 sets of 8 to 12 reps
How to progress without guesswork
Pick one main metric for a 6 week block:
- Add 1 to 2 seconds per set while keeping form identical
- Add 1 set (up to 5 total) before increasing difficulty
- Move to a slightly harder progression only when the current one feels stable
Then deload for a week: less volume, more mobility, and let the elbows calm down. This is boring, but it works.
Accessories and equipment: what actually helps
Bar vs rings: which is better?
A straight bar is stable and predictable, which is great for learning. Rings add instability and can feel nicer on the wrists because they rotate naturally, but they also demand more shoulder control. If you have both, learn on a bar and occasionally practice on rings once your tuck and one leg are consistent.
Two pieces of gear I think are worth it
I’ll keep this simple and practical. If you train levers regularly, these two items can make sessions smoother:
- Gornation Gymnastic Rings: useful if you want to practice German hang and lever progressions with a wrist friendly rotation and adjustable height
- Gornation Liquid Chalk: improves grip consistency when your hands sweat, which helps you focus on position instead of slipping
Neither is mandatory, but both are “quality of life” upgrades that make lever training less annoying.
Common mistakes that slow progress (or irritate your elbows)
Rushing to full range too soon
The back lever looks close when you’re at half lay, so people jump to full and start grinding ugly holds. In my experience, that’s when elbows flare up. Earn the full position with clean sets, not with heroic saves.
Loose tuck and early hip opening
In the tuck back lever, your knees should be tight to your chest. Many athletes think they’re tucked, but they’re actually in a relaxed tuck with open hips, which is much harder and makes progress feel random.
Shoulder retraction and sagging
If you see a banana shape, fix the shoulders first. Push away, protract, depress, and re lock the hollow. A straighter line is usually safer and stronger.
Training through sharp pain
Discomfort from stretching is one thing. Sharp pain in elbows or the front of the shoulder is a stop signal. Scale back, build tolerance in German hang, and return with better control. You’ll progress faster by taking one step back than by forcing a stubborn step forward.
Veelgestelde vragen
How to train the backlever if I’m still a beginner?
Start with prerequisites and a tuck back lever, not the full hold. Focus on German hang comfort, basic pulling strength, and short, high quality tuck holds. Two sessions per week is enough. If your elbows feel irritated, reduce range and build tolerance first instead of pushing intensity.
How long does it take to learn a full back lever?
It varies a lot. If you already have solid pull ups, rows, and German hang comfort, you might reach a decent full back lever in a few months. If you’re building the base at the same time, expect longer. Consistency and joint friendly progressions matter more than “grinding” harder.
Is a pronated or supinated grip better for the back lever?
For most people, pronated is the best starting point because it’s usually easier on the elbows and biceps. Supinated back lever is a valid progression later, but it can be demanding on connective tissue. Get a strong pronated lever first, then explore supinated carefully and gradually.
Why do my elbows hurt when I practice the back lever?
Elbow discomfort often comes from jumping to a hard progression, lowering too fast in negatives, or training supinated too early. Go back to controlled German hangs and easier lever positions, keep shoulders active, and avoid max effort attempts for a few weeks. If pain is sharp or persistent, stop and get it checked.
What’s the best way to program static holds for how to train the backlever?
A good template is 3 to 5 sets of 6 to 12 seconds in a progression you can control, two times per week. Accumulate about 30 seconds total hold time per session. When you can hit that with clean form, move to a slightly harder progression or lower closer to parallel.
How to train the backlever comes down to three things: respect the prerequisites, drill the right body position, and progress one clean step at a time. Get comfortable with German hangs, build a strong tuck, and use either static holds or the vertical method to earn your way to parallel. Keep your shoulders protracted and depressed, stay tight through the core, and treat elbow pain as feedback, not something to “push through.” If you stay consistent for a few weeks at a time, the back lever stops being a trick and becomes a skill you can repeat on command.


