
The human flag looks like pure magic, but it’s mostly smart training and patience. If you’ve tried it and felt your body instantly rotate off the pole, you’re not alone. In this guide I’ll show you a clear, realistic path from beginner drills to a clean full flag, without overcomplicating it. We’ll cover the prerequisites you actually need, the key technique cues that stop the spin, a simple weekly plan, and the most useful progressions like low flag, high flag, angled and twisted flags. I’ll also share a couple of equipment picks that genuinely make practice smoother.
What the human flag really is (and why it feels impossible at first)
A solid human flag is a full body side lever: your body stays long and stiff while you hang from a vertical pole or ladder. The part most people miss is that it’s not “just core”. It’s a coordination problem between your shoulders, lats, and obliques.
Think of it like this: your top arm pulls and your bottom arm pushes at the same time. If you only pull, you’ll curl in. If you only push, you’ll slip and rotate. Once that push pull pattern clicks, progress becomes much more predictable.
Prerequisites: earn the right to train the flag
You can start drilling flag positions before you’re extremely strong, but a few basics make training safer and faster. My honest take: skipping these doesn’t make you “hardcore”, it just makes the flag feel random.
Strength benchmarks that matter
A practical benchmark is being able to do 3 sets of 10 clean pull ups. That usually means your lats and grip can handle the pulling side of the flag without your form falling apart instantly.
If you’re not there yet, build it first. Two helpful resources:
- Assisted pull ups for volume without ugly reps
- How to increase your pull up numbers if you’re stuck
I also like wide pull ups as an accessory once you already have good basics, because they teach strong lat engagement and control through the shoulder. Here’s a guide: How to do wide pull ups.
Two specific prerequisites: one arm positions
Before you grind flag holds, get comfortable with these two positions on both sides:
- One Arm Active Hang: hang on one arm with the shoulder packed and stable, not shrugged into your ear. Start with short holds.
- One Arm Inverted Support: in an inverted position, learn to support and control your shoulder with one arm while staying tight.
These teach the single arm shoulder control that the human flag demands. If one side feels shaky, believe it. The flag will expose it anyway, so you might as well address it early.
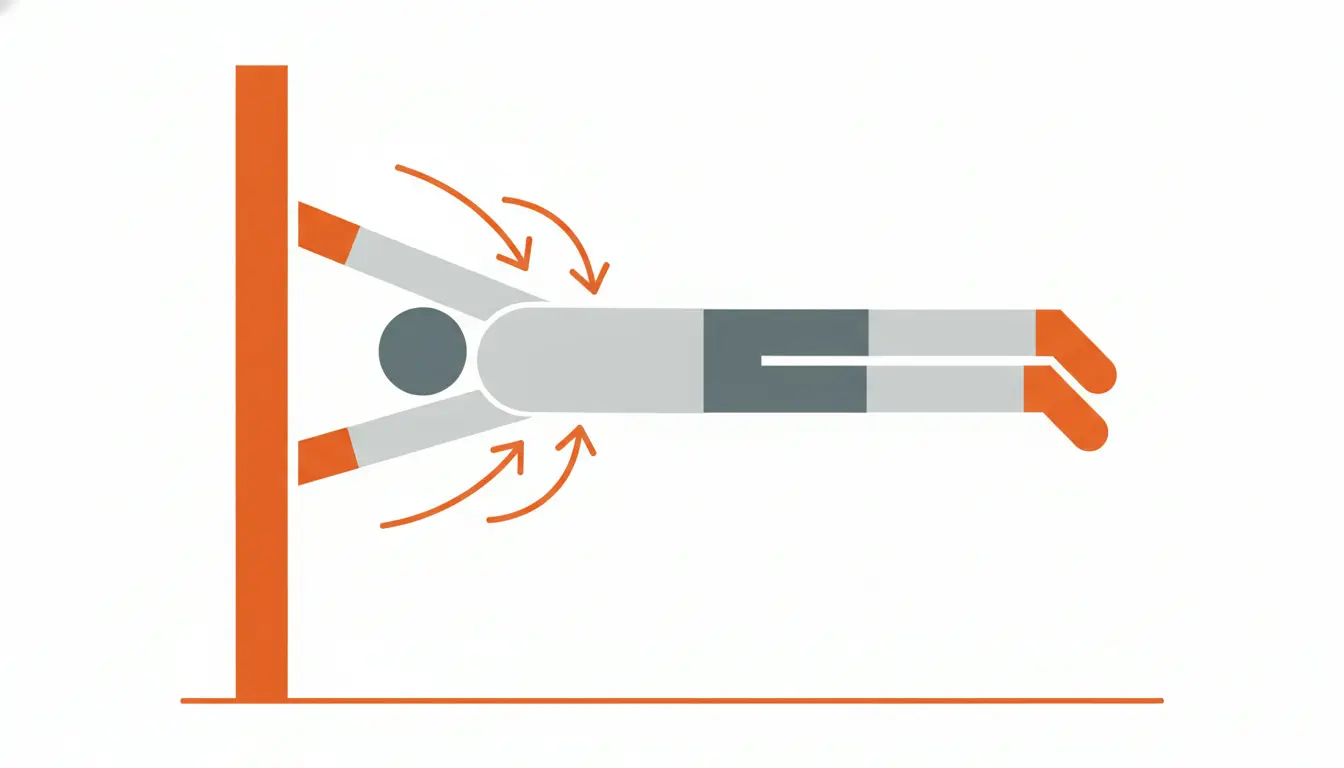
Setup and grip: stop the spin before it starts
Most failed attempts aren’t a strength issue, they’re a setup issue. A tiny misalignment turns into a big rotation once you’re horizontal.
Best equipment choices for learning
You can train the flag on a pole or on stall bars. In my experience, stall bars or a ladder style setup is often easier because the hand position feels more secure and you can standardize your heights.
Whatever you use, make sure it doesn’t wobble. A moving pole turns technique practice into guesswork.
Hand alignment rule (the simplest cue that works)
Place your hands so they are directly above and below each other. If the top hand is offset even a bit, your body will try to twist and you’ll waste energy fighting rotation.
On stall bars, a simple trick is to place both hands so they “touch the same edge line” of the bar. That gives you a physical reference for alignment instead of relying on feel.
Push pull intent: what each arm should do
Here’s the cue I use with most athletes: the bottom arm pushes the world away while the top arm pulls your ribs toward the pole. Don’t over bend the elbows. You want strong shoulders and lats doing the work, not a biceps curl.
Warm up and activation (do this if you want consistent sessions)
If your shoulders and shoulder blades aren’t awake, the flag feels heavy and your elbows take the stress. Keep the warm up short but specific.
Start with 5 to 10 minutes of easy cardio, then do an activation circuit. If you want a full framework, this guide is useful: How to warm up for calisthenics training.
Quick activation circuit (8 to 10 minutes)
Cycle through the following with control. The goal is quality, not suffering.
- Scap push ups: 12 reps
- Hollow body rocks: 12 reps, 2 sets
- Arch body rocks: 12 reps, 2 sets
- Scap pulls: 12 reps
- Hanging scap rotations: 8 reps
- Scap shrugs: 12 reps
This combination builds the scap control that carries over to everything from muscle ups to handstand work. And yes, it’s boring. It also works.
Human flag progressions: beginner to advanced (the ladder that makes sense)
Progressions are where most articles get messy. Here’s the clean path I recommend. Don’t rush it. Many steps are technical, and moving on too early usually creates that “banana flag” shape or a constant spin.
Step 1: Downward low flag
This is where you first learn the push pull pattern with a safer angle. Keep your hips close to the pole, knees slightly tucked if needed, and focus on a stable shoulder position rather than height.
Key cues:
- Bottom arm straight and pushing
- Top shoulder down and tight, not shrugged
- Ribs tucked so your core stays braced
Step 2: Low flag (chest opens)
Once downward low flag feels stable, start turning the chest more “open” so you’re building real shoulder control. This step is where many people realize their shoulders are the limiting factor, not their abs.
Work in short holds and never grind through pain. A little discomfort from effort is fine. Sharp joint pain is a stop sign.
Step 3: High flag (your foundation)
The high flag is the base position for almost everything that comes later. Often you’ll climb into an inverted position and use your feet for light support at first. Then you gradually reduce how much the feet help.
I like this step because it makes entries repeatable. If you can’t enter the position consistently, you can’t practice it consistently.
Step 4: High flag swing ups (efficient entries)
High flag swing ups teach you a convenient, repeatable way to get into the high flag without wasting energy. Keep them controlled. If you’re launching yourself and catching the position, you’re practicing chaos.
Step 5: Angled flags (tuck and one leg)
From high flag work, start lowering into angled flags. Two great options:
- Tuck angled flag: knees in, easier lever
- One leg angled flag: one leg straight, one tucked
Angled flags build positional awareness. They also show you whether you can keep your hips stacked instead of drifting behind you.
Step 6: Twisted flags (make it hard, but not brutal)
In a perfect human flag your chest faces forward. Twisted flags are a smart bridge: you lower toward parallel while keeping the chest slightly turned upward. That little twist makes the position more manageable and lets you accumulate time under tension.
Use twisted variations in tuck, one leg, straddle, or even half lay later on.
Step 7 to 11: Tuck, one leg, straddle, half lay
Now you’re in the “real” flag line, just with different lever lengths. Progress in this order:
- Tuck human flag: chest forward, knees tucked
- One leg human flag: one leg extended
- Straddle human flag: legs apart to shorten the lever
- Half lay human flag: one of the most underrated steps
Half lay is the step people love to skip. I get it, it doesn’t look as cool. But it’s often the cleanest bridge to a full flag because it teaches your hips and ribs to stay locked while the lever gets long.
Step 12 and 13: Full human flag and dynamic work
When your half lay is stable, the full human flag becomes a small step instead of a giant one. Start with short holds. Then you can add dynamic work like controlled negatives, small presses, or swing entries using easier variations (like tuck) to keep volume high without wrecking your shoulders.
A simple weekly plan that actually fits real life
Skill work needs frequency, but your shoulders also need recovery. The sweet spot for most beginners and intermediates is two focused flag sessions per week, plus short activation work on a few other days.
Weekly structure
- 2x per week: full human flag session (progressions, holds, negatives)
- 3x per week: short activation circuit (scap and core control)
- Optional: one extra easy technique day if your elbows and shoulders feel great
Session template (45 to 60 minutes)
1) Warm up: 5 to 10 minutes cardio + activation circuit
2) Main skill: pick 1 to 2 flag progressions and do 4 to 8 quality sets
3) Strength builder: slow negatives or push outs (details below)
4) Cool down: 5 to 10 minutes easy shoulder and lat stretching
Strength builders that transfer
If you only do holds, you might stall. These two drills tend to move the needle:
- Upright flag holds and push outs: great for learning the push with the lower arm while staying tight.
- Slow negatives: lower from an easier position toward a harder one for about 10 seconds. If you lose control, stop and reset rather than “falling through”.
Rest enough to stay crisp. For holds, 90 seconds to 2 minutes is normal. If you rush rests, your form will degrade and your joints will pay for it.
Training the human flag without a pole
No pole, no problem. You won’t get the exact pattern without a vertical support, but you can build most of the engine: shoulders, lats, core stiffness, and scap control.
The best no pole exercises
- Side plank variations to hammer the obliques
- Hollow body and arch work for trunk stiffness
- Pull ups and rows for lats and upper back
- Handstand push up progressions to strengthen shoulders
If you need a clear plank reference, this is a solid guide: How to plank.
My honest equipment take (only what helps)
Two pieces of gear can make flag training smoother without turning it into a shopping list:
- Gornation resistance bands: useful for assisted entries and for reducing load during negatives when your shoulders are close but not ready.
- Gornation liquid chalk: if your hands slip on a pole, chalk is often the difference between practicing technique and just fighting grip.
Everything else is optional. Good progressions and consistent practice matter more than fancy setups.
Common mistakes that keep people stuck
I see these over and over. Fixing just one can unlock the next progression.
1) Bent bottom arm and collapsed shoulder
If your bottom elbow bends, you lose the strongest pushing line and your shoulder gets cranky fast. Keep the bottom arm long and think “push away”.
2) Chasing the full flag too early
If you can’t hold a clean angled or twisted flag for a few seconds, full flag attempts are mostly ego practice. Build time in the easier shapes first. It’s not slower, it’s faster.
3) Letting the ribs flare
Ribs flaring turns your body into a wobbly banana. Keep a slight posterior tuck and brace like you’re about to take a light punch. Your line will improve immediately.
4) Ignoring side to side differences
Most people have a strong side. Train both, but give the weaker side a little extra volume with easier progressions. That’s usually enough to close the gap over time.
Veelgestelde vragen
How to train the human flag if I can’t do 10 pull ups yet?
You can still start with activation drills and early progressions, but your pulling side will limit you. Build toward stronger pull ups with assisted work, negatives, and consistent volume. Keep flag practice to low angle holds and technique so your shoulders learn the pattern without you grinding sloppy reps.
How to train the human flag without hurting my shoulders?
Prioritize scap control, warm up properly, and keep the bottom arm straight with an active shoulder. Use short, high quality sets and stop before form collapses. If a position causes sharp joint pain, regress immediately. Most shoulder issues come from rushing progressions and training fatigued.
How to train the human flag faster: holds or negatives?
Both matter. Holds teach positioning and endurance, while slow negatives build strength through the exact range you need. I prefer combining them: start with 4 to 8 sets of controlled holds in your current progression, then add 3 to 5 sets of 8 to 12 second negatives.
Which human flag progression should I focus on as a beginner?
Most beginners should live in the downward low flag and low flag until they can control their shoulders and stop rotating. Once those are stable, the high flag becomes your main base. It’s the position that makes your training repeatable and sets you up for angled and twisted flags.
How to train the human flag on stall bars versus a pole?
Stall bars often feel easier because your grip is more predictable and you can check hand alignment quickly. On a pole, grip and slipping can become the main challenge. Either works, but prioritize stability and consistent hand placement. Misaligned hands are a common reason you spin out of position.
To train the human flag efficiently, treat it like a skill with a clear ladder, not a one day strength test. Build your base with pull ups, one arm control, and scap activation, then climb through low flag, high flag, angled and twisted variations until the full position is just the next small step. Keep your hands aligned, push with the bottom arm, pull with the top arm, and progress only when your holds look clean. If you stay consistent with two focused sessions per week, the flag stops feeling like a mystery and starts feeling like a project you can actually finish.


